As of July 1, 2023, Connecticut residents aged 21 and over have the opportunity to cultivate cannabis in their own homes. With the new law in effect, individuals can grow a limited number of plants for personal use, subject to specific guidelines and regulations. This article aims to provide an overview of Connecticut's home cultivation laws, ensuring that aspiring growers are well-informed and prepared to cultivate cannabis responsibly.
1. Legal Limits and Requirements

Connecticut's Department of Consumer Protection has outlined the key provisions for home cultivation. Adults aged 21 and over can grow up to three mature plants and three immature plants per household. The total number of plants per household should not exceed 12. It is crucial to note that these limits apply regardless of the number of adults residing in the household.
2. Secure and Private Growing Spaces

To ensure safety and prevent unauthorized access, cannabis cultivation must take place indoors in a secure and locked area. This designated space should not be visible to the public or street, minimizing any potential concerns from neighbors or passersby. By maintaining a controlled environment, individuals can cultivate cannabis plants without compromising security or public perception.
3. Safeguarding Children, Pets, and Others

As responsible cannabis cultivators, it is essential to protect children, pets, and individuals who should not have access to cannabis. Connecticut's Department of Consumer Protection emphasizes the need to secure cannabis plants from unauthorized handling. This entails keeping the plants out of reach and sight of children, pets, and other individuals. Practicing safe and healthy gardening techniques is also recommended to ensure the quality of the final product.
4. Responsible Consumption and Storage

In addition to home cultivation, Connecticut's cannabis laws highlight the importance of responsible consumption. It is crucial for adults who choose to consume cannabis to do so responsibly. Cannabis products purchased at a dispensary should be stored in their original child-proof packaging, locked away, and placed out of reach of children and pets. By adhering to these guidelines, individuals can minimize the risk of unintended consumption and promote a safe environment within their homes.
5. Additional Considerations
Connecticut's embrace of home cultivation aligns with the state's broader efforts to regulate and normalize cannabis use. Since January 10, 2023, licensed retailers have been selling cannabis for adult-use purposes. Moreover, since October 1, 2021, medical marijuana patients aged 18 and older have been allowed to cultivate up to three mature and three immature plants at home, with a maximum of 12 plants per household.
Connecticut's legalization of home cultivation offers individuals aged 21 and over the opportunity to engage with cannabis on a more personal level. By adhering to the established guidelines, aspiring cultivators can enjoy the benefits of growing their own cannabis while ensuring safety, responsible consumption, and compliance with the law. Whether for personal use or as a means of embracing sustainable and self-sufficient practices, home cultivation in Connecticut presents an exciting avenue for cannabis enthusiasts to explore.
A Beginner’s Guide to Growing Cannabis at Home
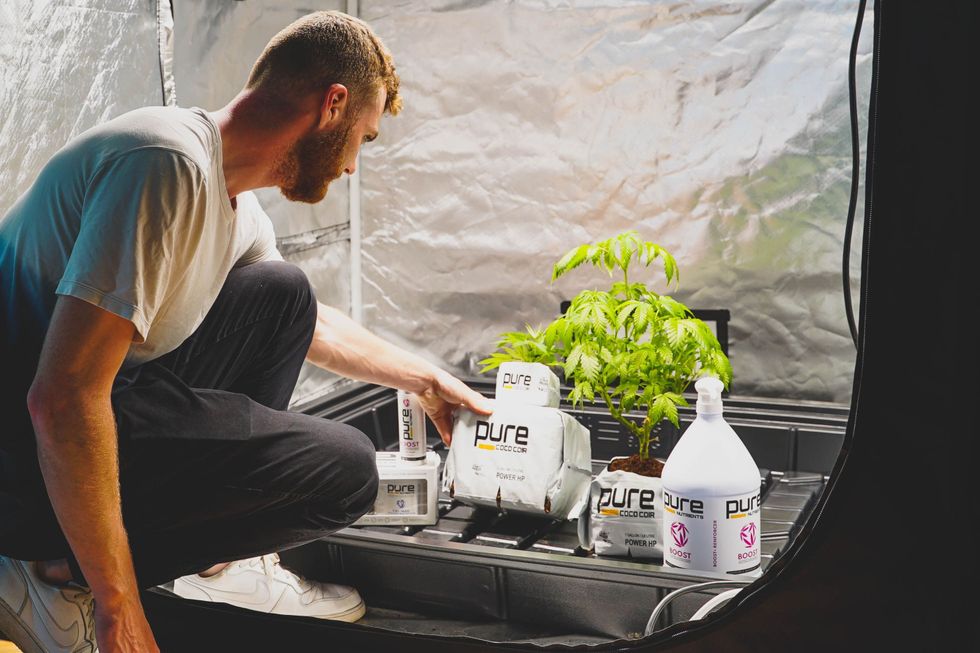 A Beginner’s Guide to Growing Cannabis at Home
Growing cannabis at home can be a rewarding and cost-effective way to enjoy high-quality buds. Whether you choose to grow indoors or outdoors, understanding the basic steps involved in cultivating cannabis is essential for success. In this primer to growing at home, we will walk you through each stage of the growing process, from selecting your growing space to harvesting your plants. By following these steps, you'll be on your way to growing your own cannabis at home.
Step 1: Choose Where You Will Grow (Indoors or Outdoors)
Before you start growing cannabis, you need to decide whether you will grow indoors or outdoors. Each option has its pros and cons, so consider factors such as privacy, control over the environment, cost, and potential challenges. Indoor growing offers more control over the growing conditions but requires more responsibility. Outdoor growing can be cheaper but comes with additional considerations like privacy, pests, and weather conditions.
Step 2: Choose Your Grow Light
The type of grow light you choose will greatly impact your cannabis plants' growth and yield. Several options are available, including natural sunlight, compact fluorescent light bulbs (CFLs), household LEDs, fluorescent lighting (T5/T8), LEC (CMH) grow lights, and LED grow lights. Natural sunlight is ideal but may not always be accessible. LED grow lights are popular due to their efficiency, bud quality, and ongoing technological advancements. Research the different options and select a grow light suitable for your specific growing environment.
Step 3: Choose Your Growing Medium
Selecting the right growing medium is crucial for providing your cannabis plants with the necessary nutrients and support. Common growing mediums include soil, soilless mix (such as coco coir), and hydroponics. Soil is the easiest option for beginners, while soilless mixes offer better control over nutrient levels. Hydroponics provides rapid growth and high yields but requires additional knowledge and equipment. Consider the pros and cons of each medium and choose the one that aligns with your growing goals and experience level.
Step 4: Choose Your Nutrients
Proper nutrition is essential for healthy cannabis plants and optimal yields. If you're growing in soil, choose cannabis-specific nutrients formulated for soil-based growing. Soilless and hydroponic growers should use nutrients designed for their respective growing mediums. Look for nutrient systems that are easy to use, well-tested, and affordable. Dyna-Gro (Grow, Bloom) is one nutrient system recommended for beginners due to its simplicity and effectiveness.
Step 5: Ensure Proper Watering
Watering cannabis plants correctly is crucial to prevent over or under watering. Determine the water needs of your specific growing medium, whether it's soil, soilless mix, or hydroponics. Use good-quality water, preferably with low mineral content (200-300 PPM or less). Tap water is usually suitable, but if you're concerned about its quality, or only have well water consider using purified or reverse osmosis (RO) water. Monitor your plants' water requirements and adjust accordingly to maintain healthy growth.
Step 6: Maintain Adequate Temperature and Humidity
Maintaining optimal temperature and humidity levels is vital for cannabis plants' growth and development. Different stages of the plant's life cycle require specific temperature ranges. Generally, young plants thrive in temperatures between 70-85°F (20-30°C), while flowering plants prefer slightly cooler temperatures around 65-80°F (18-26°C). Monitor the temperature in your grow space and consider using fans, air conditioners, or exhaust systems to regulate heat and humidity.
Step 7: Implement Proper Ventilation and Air Circulation
Proper ventilation and air circulation is needed to create a perfect growing environment for your plants. It’s important because air is present in nature, where cannabis grows naturally so if you want to grow great cannabis you will have to create good growing conditions and air is one of the primary ingredients.
Step 8: Choose Your Cannabis Strain
Choosing the right cannabis strain is an important step in your cultivation journey. There are countless strains available, each with its own unique characteristics and effects. When selecting a strain to cultivate, consider the following factors:
- Indica vs. Sativa: Indica strains tend to have relaxing and sedating effects, while Sativa strains are known for their uplifting and energizing qualities. Determine the desired effects you are looking for to guide your strain selection.
- THC and CBD Levels: THC is the psychoactive compound responsible for the "high" associated with cannabis, while CBD is a non-intoxicating compound with potential therapeutic benefits. Different strains have varying levels or potency of THC and CBD, so choose a strain that aligns with your preferences and desired effects.
- Growing Difficulty: Some strains are more forgiving and easier to grow, making them suitable for beginners. Look for strains labeled as beginner-friendly or low-maintenance if you are new to cultivation.
- Yield and Flowering Time: Consider the expected yield and flowering time of the strain. If you have limited space or time constraints, opt for strains that have shorter flowering periods and can produce satisfactory yields.
- Climate Suitability: Certain strains thrive better in specific climates. Research strains that are suitable for your local climate conditions, whether you are growing indoors or outdoors, in soil or pots, or hydroponically.
- Terpenes, Flavor and Aroma: Cannabis strains offer a wide range of flavors and aromas, as well as terpenes, from fruity and citrusy to earthy and spicy. Consider the terpene profiles of different strains to find flavors that appeal to your taste buds.
Remember to obtain seeds or clones from reputable sources to ensure genetic quality and authenticity. Online seed banks and local dispensaries are popular options for acquiring cannabis genetics.
Step 9: Germinate and Plant Your Seeds or Clones
Once you have selected your preferred cannabis strain, it's time to germinate and plant your seeds or clones. Here's a general overview of the process:
- Germination: There are various methods to germinate cannabis seeds, including the paper towel method, direct planting in a growing medium, or using specialized germination kits. Follow the specific instructions provided by the seed bank or breeder for the best results.
- Seedling Stage: Once your seeds have sprouted, transfer them to small pots or seedling trays filled with a suitable growing medium. Provide gentle lighting, such as fluorescent lights or CFLs, and maintain a consistent temperature and humidity level to support healthy seedling growth.
- Vegetative Stage: As your seedlings develop into young plants, they will enter the vegetative stage. Provide ample light, usually 18-24 hours per day, to encourage robust growth. Maintain appropriate temperature and humidity levels, and water your plants as needed. Consider using nutrient solutions specifically formulated for the vegetative stage to promote healthy foliage development.
- Transplanting: When your plants have outgrown their seedling containers, carefully transplant them into larger pots or your chosen growing medium. Be cautious not to damage the roots during the process. This step is crucial for ensuring adequate space and nutrient availability for your plants to thrive.
Step 10: Monitor and Maintain Plant Health
Regularly monitor your plants for signs of pests, diseases, nutrient deficiencies, or other issues. Early detection allows for prompt treatment and prevents the problem from worsening. Maintain cleanliness in your growing area and regularly inspect your plants' leaves, stems, and buds.
Keep an eye out for common cannabis pests such as spider mites, aphids, fungus gnats, or powdery mildew. If pests are present, consider using organic or chemical pest control methods appropriate for the stage of growth, which can include Neem Oil, Diatomaceous Earth, Peppermint Oil or simiar. Be cautious when using chemical solutions and always follow the instructions carefully or better yet try to avoid using chemicals at all with anything you plan to ingest and/or combust.
Step 11: Flowering and Harvesting
As your cannabis plants transition into the flowering stage, they will develop buds. The flowering stage typically lasts 8-12 weeks, depending on the strain. During this time, it's crucial to maintain consistent light schedules. For indoor growers, switch to a 12/12 light cycle (12 hours of light and 12 hours of uninterrupted darkness) to induce flowering.
Monitor the trichomes (resin glands) on the buds using a magnifying glass or microscope to determine the optimal harvest time. Trichomes change in color from clear to milky white or amber, indicating different levels of THC and desired effects.
To harvest, cut the plants at the base and hang them upside down in a dark, well-ventilated area with a temperature of around 60-70°F (15-21°C) and humidity of 45-55%. Allow them to dry slowly for about 7-14 days until the branches snap rather than bend. Trim the buds and store them in airtight containers, such as glass jars, to cure for several weeks. Proper curing improves the flavor, potency, and overall quality of the harvested buds
Step 13: Final Steps and Considerations
- Testing and Quality Control: Consider sending a sample of your harvested buds to a reputable cannabis testing laboratory. This allows you to determine the cannabinoid and terpene profiles, ensuring the potency and quality of your product. Testing can also identify any potential contaminants, providing peace of mind for both personal and commercial use.
- Storage: Store your cured buds in a cool, dark, and dry place to maintain their potency and flavor. Mason jars or airtight containers are ideal for long-term storage. Keep them away from direct light, heat, and excessive humidity, as these can degrade the cannabinoids and affect the overall quality.
- Enjoy Responsibly: Finally, remember to consume cannabis responsibly and in compliance with local laws and regulations. Start with small doses if you're new to cannabis or unsure of its potency. Always prioritize safety and make informed decisions when using cannabis.
Growing cannabis at home can be a rewarding and fulfilling experience. By following these steps and guidelines, you can create a suitable environment, nurture your plants, and achieve a successful harvest. Remember, each strain may have specific requirements, so adapt and adjust your approach accordingly. Enjoy the process and the end result of your homegrown cannabis.




 Cigar smoking in a bar....
  Movie theater as consumption space? Not a bad idea.....



 DEA prohibited from randomly searching passengers at airports and other transport hubs - The Bluntness
commons.wikimedia.org

 Coffee & Weed: A Modern Spin on the Hippie Speedball - The Bluntness
Photo by
  Coffee & Weed: A Modern Spin on the Hippie Speedball - The Bluntness
Photo by
  Coffee & Weed: A Modern Spin on the Hippie Speedball - The Bluntness
Photo by
 What Are Psychedelics?
 Puffco Pivot Review: The Ultimate Portable Concentrate Vaporizer - The Bluntness
 Puffco Pivot Review: The Ultimate Portable Concentrate Vaporizer - The Bluntness
 Puffco Pivot Review: The Ultimate Portable Concentrate Vaporizer - The Bluntness